Saturday, March 27, 2010

Thrifty Find

Recently I've been running into these vintage beverage carts all over, while browsing the blogs or while flipping through the pages of old Country Living Magazines. Everytime one pops up I can't help but stop and drool over them. They are just so charming and glamorous. So, while on my weekend thrift store raids my husband calls me over and right infront of him was this beautiful vintage beverage cart! I instantly dropped everything in my arms and fell in love! Hubby got it for me as an early birthday gift! It's a bit rusty but overall in good shape. I'm really looking forward to getting it back into good shape in time for my birthday dinner, so I guess I've got my work cut out!

In the meanwhile, I'll be on the look out for some inspiration...

Wednesday, January 6, 2010

Charmed

Christmas gifts this year? WINE CHARMS!


They came out pretty darn good for my first try, don't ya think?

& I can't give the picture credit to my new gift...these were taken with my sister in-law's. =) So now I've gotta figure out how to do this with mine!

First, get your hands on some earring hoops. They're a few bucks at the craft stores.


Then just slip a bead of your choice in and bend the edge of the hoop with your wires to secure it to pre-made loop at the end of the hoop.


and you're done! I made all of these in minutes!

Monday, December 7, 2009

Holiday Boutique...

My sister in law hosted a Holiday Boutique this weekend. I wish I had a camera! I would have gone around taking pictures of all of the fabulous ladies who were there and their booths. Oh well...here are a few pictures I took with my husbands phone!


So here are my creations! Magnets, wine chars, upcycled jewelry, a few headbands, and some boxy pouches!


Cute, right? They're like two inches tall!


& a wine charm!

I really wish I had a camera so I could have taken better pictures of my work as well as pictures of the other products. = ( oh well...maybe Santa will bring one?


Sunday, November 8, 2009

Afternoon Project


This was such an easy and fast project that I can't believe I've been putting it off for so long! I'm really happy with the results! To make this for yourself:


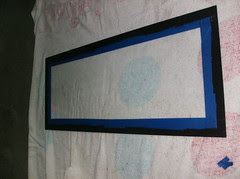
1. Measure and tape a 1/2" border on your frames. You can really use any size frames. I've had these for about 5 years and just didn't know what to do with them.


2. Now you want to take your acrylic paint and a sponge and paint two to three coats along the edges. This is where you can really get creative with the colors! I chose black because that's the theme we've got going in our hallway and I thought it'd look good with the decal. Wait about thirty minutes to an hour to dry.

*Note: I used acrylic paint so I can easily wash the paint off if I ever want to change it up and use the frames for something different. But you could probably use any kind of paint you'd like.


3. What you do now is cut out paper for the background (any kind really, I used white wrapping paper) the size of your frames and stick your decals on the paper. If you wanna go for the effect that we went with , separating the image onto different frames; remember to leave a 1/2" space on the continuing paper background for the border we've painted on.
4. Then just place the glass PAINT SIDE DOWN on your artwork and clip it closed!
Ta Da!!


What do you think?

Saturday, October 3, 2009

What was old...

Now made new!


I purchased this very sturdy and heavy wood coffee table at the Goodwill store a few weeks ago. I've been searching for one with this type of a shape for quite some time now. This table caught my attention immediately and to my surprise was only $5.00! An even bigger surprise was when I got to the register and was told it was fifty percent off! So, this is my $2.50 coffee table re-vamp!

A little paint, one late night of work, and voila!


I'm so happy with the way it came out.


MMm...Breakfast on the new table. Yay!

Wednesday, September 30, 2009

Thrifty Find

Every payday I head over to the Goodwill, and today I totally scored!!! I found this gorgeous Thomas O'Brien duvet originally priced $69.99 for only $15.00!!!


This will be a nice transition from my bright orange and lime green (teen-ish, but so easy to maintain) comforter I have now. YAY!!!

Sunday, September 27, 2009

Before and After

Before:


After:


So since we moved into this condo it has not felt like home...till now! We spent a few weekends working on it and we were finally able to cover up all that yucky wood! It feels so good cooking and working in this space now. More open and it also feels good that we did it ourselves! We did save the cabinet doors to refinish at a later time. We have a few ideas (it's a secret, just in case we mess it up!). Well, this is it! What do you think?